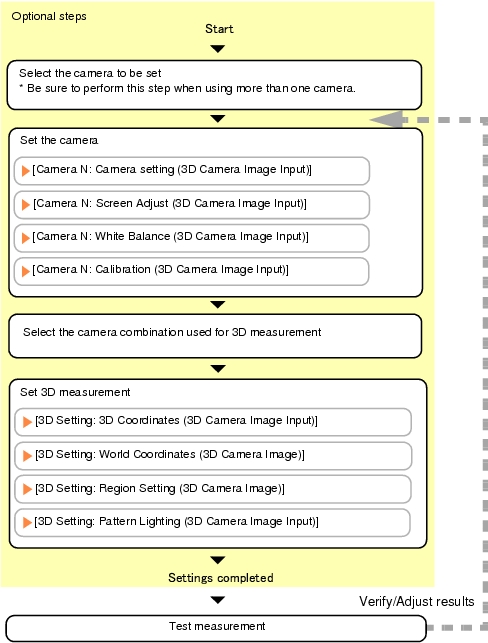
Setting [3D Camera Image Input]
The setting procedure for [3D Camera Image Input] is as follows:
 Note
Note
Operations of the ProcItem Setting window
- In the Edit Flow window, tap [3D Camera Image Input].
The ProcItem Setting window is displayed.
- In the "Item tab" area (top), tap [Camera N], where N is a Camera No., and configure imaging setting for that camera.
 Note
Note- When setting multiple cameras, repeat the procedure above for each camera.
- Select the combination of cameras to perform 3D measurement.
The following camera combinations are possible.
Table:
Camera Combination
|
|
|
|
|
Camera 0 and Camera 1 are used.
|
|
|
Camera 2 and Camera 3 are used.
|
|
|
Camera 0, Camera 1, and Camera 2 are used.
|
[Note 1]: Standard camera photographs from the front of the target object.
- In the "Item tab" area (top), tap [3D setting].
- In the "Set camera number" area, tap [
 ] for [Cameras:] and select a camera number.
When [3D setting] is specified, "Set camera number" is always displayed.
After selecting the camera, check the image displayed in the "Image display" area.
Important
- When changing the camera combination from two cameras to three cameras or three cameras to two cameras, a message appears indicating that the 3D coordinate settings will be initialized. If the camera combination is changed, reset the 3D coordinate setting parameters of the 3D setting.
 Note
Note- The images from the camera selected in the "Set camera number" area of [3D setting] will be the object to be measured in the following units.
If you need to switch the camera during the process, insert a [3D Camera Switching] unit in the scene and switch the image source. 3D Camera Switching
- Perform 3D setting.
For each operation, see the following:
If the tabs in the screen above are not displayed in the "Item tab" area (bottom), tap [3D setting] in the "Item tab" area (top).
- Tap [OK].
After confirmation, the ProcItem Setting window will be closed.
- Perform a test measurement.
An image from the selected camera is displayed in the "Image display" area.
- Adjust the image, as necessary, if the image cannot be input properly because it is out of focus or for some other reason.
 User's Manual, "Operations of ProcItem Setting Window".
 Camera Setting Option List. For each operation, see the following:
 ] for [Cameras:] and select a camera number.
 Note
Note 3D Camera Switching


