[Model (Search)]
Register the Feature images of the measurement object as a model.
Important
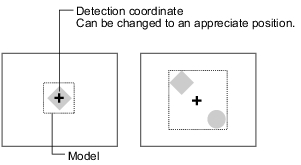
- When a model is registered, the central coordinates of the model are registered as the detection coordinates (if multiple figures are combined, the central coordinates of the circumscribed rectangle are registered). For this, ensure the position of the measurement object to be correct when registering a model.
- In the "Item tab" area, tap [Model].
When setting a new model, you do not have to tap [Model].
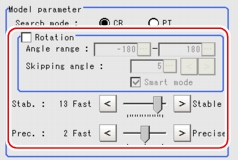
- If necessary, set up the "Model parameter" area.
- Specify a region to be registered as a model by using one of the Drawing tools.
Table:
Drawing Tools Available for Model (Search)
|
|
|
|
|
|
|
|
|
|
 Note
Note- If the model is an ellipse, its circumscribed rectangle is displayed as the search result of the model.
- To save the registered model image, check the [Save registered model] option.
- Tap [OK].
 Note
Note- If you want to change only the detection coordinate after registering the model, set up [Detection point].
- 'Registered model image' refers to the image saved when a model is registered. Saving a registered model image allows you to modify model parameters using that registered model image even when the actual measurement object is not present. Note that the scene data size increases when a registered model image is saved.
Changing [Model Parameter]
This item can be changed if necessary. Usually, the factory default value can be used.
When any settings have been changed, verify whether measurements can be performed correctly through actual measurement.
 Note
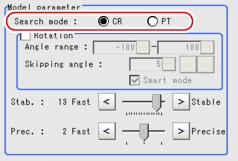
Note- In the "Model parameter" area, select the search detection method and specify a value for each item.
Table:
Model - Model Parameter
|
Set Value [Factory Default]
|
|
|
|
This search mode detects areas with a high degree of correlation between the registered model image and the input image.
|
|
This search mode detects areas with a high degree of shape similarity between the registered model image and the input image. It is available only when 3 Mega pixel color camera is connected.  User's Manual, "Configuring Search" User's Manual, "Configuring Search" |

Table:
Model - Model Parameter - CR
|
Set Value [Factory Default]
|
|
|
|
Specify whether to rotate the image during a search.
|
|
|
|
|
Specify the upper and lower limit values for [Angle range] (rotation angle) during a search. The normal direction is clockwise. Settings must satisfy: lower limit ≦upper limit.
|
|
|
|
|
Specify the stepping angle (in degrees) by which the model is rotated to create rotated models. A smaller angle increases stability, but slows down the processing.
|
|
|
Specify whether or not to enable Smart mode.
Checking the [Smart mode] option enables a high-speed rotation search. The stability may be lowered when the model shape aspect ratio is large or when the NOT mask is used.
|
|
[9] (for cameras with more than 640 by 480 pixels)
[12] (for cameras with 640 by 480 pixels or less)
|
Specify the stability of detection. A larger value increases stability. A smaller value speeds up processing. If lowering stability leads to slower processing, it is likely that many candidates have been detected. In this case, specify a larger value for [Candidate LV] or [Stab.].
|
|
|
Specify the position precision of the measurement coordinates. A larger value increases precision, and a smaller value speeds up processing.
|
- If necessary, check "Rotation" and specify a value for each rotation item.
For "Angle range" and "Skipping angle", tap [...] and specify a range of the rotation angle.
The "Skipping angle" value can be adjusted by tapping [<] or [>].
- The values for "Stab." and "Prec." can be specified by dragging the slider.
The value can also be adjusted by tapping the buttons at both ends of the slider.
Table:
Model - Model Parameter - PT
|
Set Value [Factory Default]
|
|
|
|
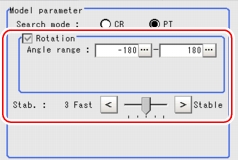
When "PT" is selected for "Search mode", search cannot be performed without rotation.
|
|
|
|
|
Specify the upper and lower limit values for "Angle range" (rotation angle) during a search. The normal direction is clockwise.
Settings must satisfy: lower limit ≦ upper limit.
|
|
|
|
|
Specify the stability of detection. A larger value increases stability, and a smaller value speeds up processing. If lowering stability leads to slower processing, it is likely that many candidates have been detected. In this case, specify a larger value for "Candidate LV" or "Stab.".
|
- If necessary, specify a value for each item.
Tap [...] for "Angle range" and specify the range of the rotation angle.
- The value for "Stab." can be specified by dragging the slider.
The value can also be adjusted by tapping the buttons at both ends of the slider.
Points on Adjustment
To improve measurement results, make adjustments as described below.
When measurement results are unstable
- If the model image consists of detailed figures, specify a larger value for "Stab.".
- If images that should be judged OK based on the model image vary in some degree, specify a smaller value for "Candidate LV".
- If the measurement results are unstable only when "Rotation" is selected, specify a smaller value for "Skipping angle".
- When "Rotation" is selected, if the model region shape is complex, uncheck the "Smart mode" option.
When the processing speed is slow
- If the model image is a simple figure or a large figure, specify a smaller value for "Stab.".
- If images that should be judged OK based on the model image, have less variation, specify a larger value for "Candidate LV".
- When "Rotation" is selected, if the model image is a simple figure, specify a larger value for "Skipping angle".
- When "Rotation" is selected, if the model region shape is simple, check the "Smart mode" option.
Displaying a Model
Display a registered model in the "Image display" area.
- In the "Registered model image" area, tap [Disp model].
The registered model image is displayed in the "Image display" area.
- In the "Registered model image" area, tap [Input image].
The previous input image is re-displayed in the "Image display" area.
Re-registering a Model
When model parameters are modified, re-register the model.
- In the "Registered model image" area, tap [Disp model].
The registered model image is displayed in the "Image display" area.
- In the "Registered model image" area, tap [Re-register].
The model is re-registered using the modified model parameters.
Deleting the Registered Model Image
To delete the registered model image:
- In the "Registered model image" area, tap [Delete].
A confirmation message appears.
- Tap [Yes].
The registered model image is deleted.
 Setting up [Search]
 User's Manual, "Configuring Search".
 User's Manual, "Configuring Search"
 User's Manual, "Inputting a Value"
 User's Manual, "Inputting a Value"
 User's Manual, "Points on Adjustment".
 User's Manual, "Shortening Measurement Time by Setting Processing Item".


