Setting up [Set Unit Figure]

  1. In the Edit Flow window, tap [Set Unit Figure].
    The ProcItem Setting window is displayed.
    User's Manual, "ProcItem Setting Window"
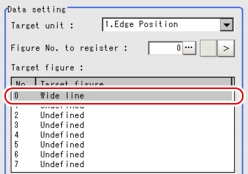
  2. In the "Data setting" area, tap [Icon] for "Target unit" and specify a target unit.
    Set Unit Figure - Data Setting Area
  3. Tap [...] for "Figure No. to register" and specify a figure number for modification.
    Set Unit Figure - Data Setting Area
    Assignment of figure numbers varies depending on Processing Items. The following table shows the Register figure Numbers assigned to each Processing Item.
    Table: List of Register Figure Numbers
    Processing Item
    Figure No.
    Item
    Filtering
    0
    Region setting
    Position Compensation
    0
    Region setting
    Color Data
    0
    Region setting
    Search
    0
    Model
    1
    Region Setting (Measurement Region)
    Flexible Search
    0
    Model (Model 0)
    1
    Model (Model 1)
    2
    Model (Model 2)
    3
    Model (Model 3)
    4
    Model (Model 4)
    5
    Region Setting (Measurement Region)
    Edge Position
    0
    Region setting
    Edge Pitch
    0
    Region setting
    Defect
    0
    Region setting
    Fine matching
    0
    Model
    Circle Angle
    0
    Region setting
    Classification
    0
    Model (Index 0: Model 0)
    1
    Model (Index 0: Model 1)
    2
    Model (Index 0: Model 2)
    3
    Model (Index 0: Model 3)
    4
    Model (Index 0: Model 4)
    5
    Model (Index 1: Model 0)
    6
    Model (Index 1: Model 1)
    :
    :
    179
    Model (Index 35: Model 4)
    180
    Region Setting (Measurement Region)
    Area Gravity
    0
    Region setting
    Labeling
    0
    Region setting
    ECM search
    0
    Model - Edit
    1
    Region Setting (Measurement Region)
    2
    Model - Mask
    3
    Error model - Edit
    4
    Error model - Mask
    3D Edge Position
    0
    Region setting
    2
    Region settings for Camera 1 or Camera 2 [Note 1]
    3D Search
    0
    Allocate Model
    1
    Region Setting (Measurement Region)
    3D Circle Search
    0
    Circle setting (circumference)
    1
    Region Setting (Measurement Region)
    2
    Color setting
    3D Height
    0
    Region setting
    1
    Search region settings for Camera 1 or Camera 2 [Note 1]
    [Note 1]: The set value will be invalid, since the value is updated whenever a measurement is performed.
    How to input a value: User's Manual, "Inputting a Value"
  4. Tap the target figure number you want to set.
    The figure number can be specified by tapping [<] [>].
    Set Unit Figure - Data Setting Area
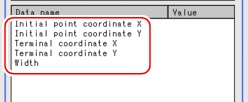
  5. Tap a data name to be modified.
    Set Unit Figure - Data Setting Area
  6. Specify a new expression.
    1. Tap [Edit] for [Set data] to set up an expression.
      Set Unit Figure - Data Setting Area
      The Setting Expression window is displayed.
    2. Specify an expression.
      For how to specify an expression, see Structure and Creation of Expression
    3. Repeat the setting of the expression when necessary.
  7. Tap [OK].
    After confirmation, the ProcItem Setting window will be closed.
  8. Perform a measurement test.
  9. Verify measurement results.
    User's Manual, "Display of the RUN Window"
    When NG is displayed, check the measurement again and make adjustments if necessary.