[Measurement (Fine Matching)]
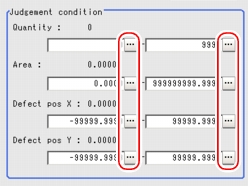
The judge OK conditions involve the number of labels, area and defect coordinates. Defect Coordinates are the gravity center of detected defects.
- In the "Item tab" area, tap [Measurement].
- If necessary, set up the "Measurement condition" area.
- When the setting has been changed, tap [Measure] in the "Detail" area to verify whether measurements can be made correctly.
- In the "Judgement condition" area, tap [...] and input a value for each item.
Table:
Measurement (Fine Matching) - Judgement Condition
|
Set Value [Factory Default]
|
|
|
|
|
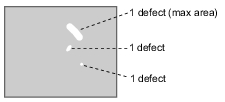
Specify the range of the number of OK labels. When the "Binary" is used, the entire white pixels will be regarded as one label.
|
|
|
|
|
|
Specify the area range of OK labels. When the "Labeling" method is used, the area of the label No. will be specified instead.
|
|
|
|
|
-99999.9999 to [99999.9999]
|
Specify the X and Y axis move range of gravity position of OK labels. When the "Labeling" method is used, the gravity position of the label No. will be specified instead.
|
|
[-99999.9999] to 99999.9999
|
|
|
-99999.9999 to [99999.9999]
|
Specify the X and Y axis move range of gravity position of OK labels. When the "Labeling" method is used, the gravity position of the label No. will be specified instead.
|
|
[-99999.9999] to 99999.9999
|
Modifying the Measurement Condition
This item can be changed if necessary. Usually, the factory default value can be used.
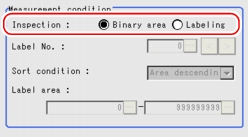
- Select "Inspection" in the "Measurement condition" area.
Table:
Measurement (Fine Matching) - Measurement Condition - Inspection
|
Set Value [Factory defaults]
|
|
|
Images that are different from the model will be converted into 2-digits images internally. Inspections that are used to detect 2-digits images should be selected.
|
|
Defect is judged based on the total area of white pixels.
|
|
A white pixel will be detected as 1 label, which is then compared with a label which is consistent with the set conditions. With this, defect will be determined.
|
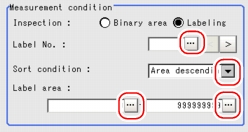
- When "Labeling" is selected for "Inspection" in Step 1, tap [...] or [
 ] for each of the following items and specify a value respectively.
If "Binary" is chosen in the "Inspection", the following operations are not necessary.

Table:
Measurement (Fine Matching) - Measurement Condition
|
Set Value [Factory defaults]
|
|
|
|
Specify the label number used to determine whether defects exist. Different settings for "Sort condition" will lead to different un-matching method.
|
|
Specify the conditions by which label numbers are re-assigned.
When the X and Y Coordinate are in accordance with the reference value, the upper left will become the origin, which will not affect the Coordinate set up through "Camera Image".
|
|
No. re-assigning begins from the label with a smaller area.
|
|
No. re-assigning begins from the label with a larger area.
|
|
No. re-assigning begins from the label with a smaller gravity X-Coordinate.
|
|
No. re-assigning begins from the label with a bigger gravity X-Coordinate.
|
|
No. re-assigning begins from the label with a smaller gravity Y-Coordinate.
|
|
No. re-assigning begins from the label with a bigger gravity Y-Coordinate.
|
|
|
|
Input the area range that is accepted as the label.
|
|
|
 User's Manual, "Inputting a Value".
 Modifying the Measurement Condition.
 Setting up [Fine matching].
 ] for each of the following items and specify a value respectively.For how to input value, see
 User's Manual, "Inputting a Value".
