[Model (ECM Search)]
Register the pattern characteristic of the measurement object as a model.
Important
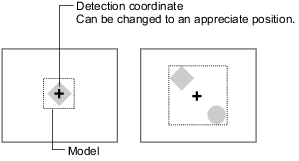
- When a model is registered, the central coordinates of the model are registered as the detection coordinates (if multiple figures are combined, the central coordinates of the circumscribed rectangle are registered). For this reason, place the measurement object in the correct position when registering a model.
- Upon re-registering a model, error models are deleted. Register error models when re-registering a model.
- In the "Item tab" area, tap [Model].
When setting a new model, you do not have to tap [Model].
- If necessary, set up the "Model parameter" area.
- Specify a region to be registered as a model by using one of the Drawing tools.
Table:
Drawing Tools Available for Model Registration (ECM Search)
Available objects to be drawn
|
|
|
|
- In the "Figure setting" area, tap [OK].
- If necessary, tap [Mask] and specify values.
- If necessary, tap [Edge extraction] to specify values.
- To check the model display, tap [Display model].
The registered model image is displayed in the "Image display" area.
 Note
Note- If you want to change only the detection coordinate after registering the model, set up [Detection point].
Changing Model Parameters
This item can be changed if necessary. Usually, the factory default value can be used.
When any settings have been changed, verify whether measurements can be performed correctly through actual measurement.
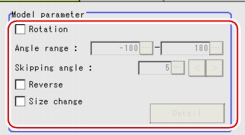
- In the "Model parameter" area, specify a value for each item.
Table:
Model (ECM Search) - Model Parameter
|
Set Value [Factory Default]
|
|
|
|
Specify whether to rotate the model.
|
|
|
|
|
Specify the upper and lower limit values for "Angle range" (rotation angle) during a search. The normal direction is clockwise. Settings must satisfy: lower limit upper limit.
|
|
|
|
|
Specify the stepping angle (in degrees) by which the model is rotated to create rotated models. A smaller angle increases stability, but slows down the processing.
|
|
|
Specify whether to allow reverse of lights and darks for the model.
|
|
|
Specify whether to allow size change for the model. When checked, tap [Detail] and specify a value for each item.
|
- If necessary, check "Rotation" and specify a value for each rotation item.
For "Angle range" and "Skipping angle", tap [...] and specify a range of the rotation angle.
The [Skipping angle] value can be adjusted by tapping [<] or [>].
- If necessary, check the "Reverse" or "Size change" option.
- When the "Size change" option is checked, tap [Detail].
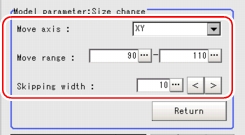
The "Model parameter: Size change" area is displayed.
Table:
Model (ECM Search) - Model Parameter: Size Change
|
Set Value [Factory Default]
|
|
|
|
Specify the direction in which to change the model size.
|
|
|
|
Specify the range in which to change the model size.
|
|
|
|
|
Specify the stepping percentage by which the model size is changed within [Move range] to create resized models. A smaller width increases precision, but slows down the processing.
|
- Tap [...] or [
 ] and specify a value for each item.
The [Skipping angle] value can be adjusted by tapping [<] or [>].
- Tap [Return].
The "Model parameter" area is displayed.
Registering a Mask
By registering a mask, the part you do not want included in the model is excluded.
- Tap [Mask].
The "Figure setting" area is displayed.
- Specify a figure to be registered as a mask by using one of the drawing tools.
Table:
Drawing Tools Available for Mask Registration (ECM Search)
Available objects to be drawn
|
|
|
|
|
|
|
|
|
|
- Tap [OR/NOT].
The figure to be registered as a mask is displayed in red.
- In the "Figure setting" area, tap [OK].
Extracting Edges
This item can be changed if necessary. Use this item when specifying the edge extraction parameters.
Important
When two different sets of [Edge extraction] settings are needed for the model registration and for measurement:
- Change the [Edge extraction] settings after registering a model.
Note that, if the model is re-registered after the change, the changed settings are reflected in the registered model.
- In the "Item tab" area, tap [Edge extraction].
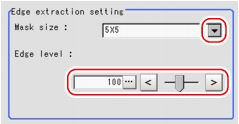
- In the "Edge extraction setting" area, tap [...] or [
 ] and specify a value for each item.
The "Edge level" value can be specified by dragging the slider or tapping one of the buttons at both ends of the slider.
Table:
Model (ECM Search) - Edge Extraction Setting
|
Set Value [Factory Default]
|
|
|
|
Specify the range of pixels which are used to extract the edge. With a larger mask size, search is less affected by variation in pixels.
|
|
|
Specify the background suppressing level for an image of which the edge is extracted. Adjust the edge level when the edge is hard to see, due to low contrast with the background, or when unnecessary background noise should be removed.
|
 Setting up [ECM Search].
 User's Manual, "Inputting a Value"
 ] and specify a value for each item.How to input a value:
 User's Manual, "Inputting a Value"
 ] and specify a value for each item.The "Edge level" value can be specified by dragging the slider or tapping one of the buttons at both ends of the slider.How to input a value:
 User's Manual, "Inputting a Value"


