[Measurement (Gravity and Area)]
Specify a range to be judged as OK.
- In the "Item tab" area, tap [Measurement].
- If necessary, in the "Measurement condition" area, select an option for [Fill profile].
If the measurement target has hole(s) in it, specify how to process the hole(s). Usually, the factory default value can be used.
Table:
Measurement (Gravity and Area) - Measurement Condition
|
Set Value [Factory Default]
|
|
|
|
|
|
In the measurement region, the part between the extracted-color start point and end point in the X-axis direction is measured as having the extracted color. Since filling is applied only to the X-axis direction, the processing is faster than [Filling up holes].
|
|
The part surrounded by the extracted color, like a doughnut hole, is filled with the extracted color.
|
- If necessary, in the "Display setting" area, set up display settings for the images displayed in the "Image display" area.
Table:
Measurement (Gravity and Area) - Display Setting
|
Set Value [Factory Default]
|
|
|
|
When checked, the image extracted with the specified color is displayed in the "Image display" area.
|
|
|
- [Black]
- White
- Red
- Green
- Blue
|
The background area surrounding the extracted image is filled with the specified color.
|
Table:
Measurement (Gravity and Area) - Display Setting
|
Set Value [Factory Default]
|
|
|
|
The image is displayed in binary with black and white.
|
- When the setting has been changed, tap [Measure] in the "Detail" area to verify whether measurements can be made correctly.
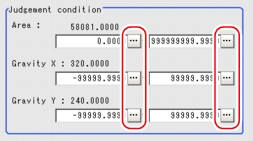
- In the "Judgement condition" area, tap [...] and input a value for each item.
 Note
Note- The values displayed in the individual fields are the measurement results of the displayed image. Take these values into consideration to determine the upper and lower limit values.
Table:
Measurement (Gravity and Area) - Judgement Condition
|
Set Value [Factory Default]
|
|
|
|
|
Specify the area to be judged as OK.
|
|
|
|
|
-99999.9999 to [99999.9999]
|
Specify the range of X-axis shifting that is judged to be OK.
|
|
[-99999.9999] to 99999.9999
|
|
|
-99999.9999 to [99999.9999]
|
Specify the range of Y-axis shifting that is judged to be OK.
|
|
[-99999.9999] to 99999.9999
|
 User's Manual, "Inputting a Value"
 Note
Note Setting up [Gravity and Area].


