Camera Placement (Panorama+)
Set the camera placement.
- In the Item Tab area, tap [Arrangement].
- In the "Display" area, tap [Change display] to switch between camera image types.
 The displayed contents of the Image Display area will be switched.Setting itemSet value
[Factory default]DescriptionDisplayThroughThe latest image is always input from the camera and displayed.[Freeze]The image that was scanned in the immediately preceding measurement is displayed. - Set the camera settings.
 Setting itemSet value
[Factory default]DescriptionCamera select- [0+1]
- 0+1+2
- 0+1+2+3
Select the combination of cameras to combine the images from.
0+1: Combine the images from Camera0 and Camera1.
0+1+2: Combine the images from Camera0, Camera1, and Camera2.
0+1+2+3: Combine the images from Camera0, Camera1, Camera2, and Camera3. - Set the camera placement.
 Setting itemSet value
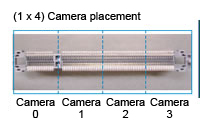
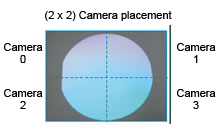
[Factory default]DescriptionArrangement- [One line]
- Two line
Set the camera image placement.
 Important
- If the configuration of the connected camera is changed, the measurement result is NG (incompatible image).Press the initialize button and re-do the settings.
- Do not set [Camera Image Input] or [Camera Image Input HDR+] after [Panorama+].