Model Registration (Shape Search+)
Register the parts to measure as the model.
The position at the time of registration is also registered in the model information.Place the measurement object in the correct position when registering a model.
The position at the time of registration is also registered in the model information.Place the measurement object in the correct position when registering a model.
- In the Item Tab area, tap [Model register].When setting a new model, you do not have to tap [Model register].
- Use the drawing tools to specify the model registration range.

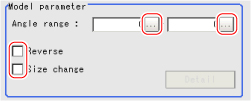
- This sets the model parameter.
 Setting itemSet value
[factory default]DescriptionUpper limit-180 to 180
[0]When the measurement object is rotating, set how large the angle range is for creating rotated models.The skipping angle is set automatically.Lower limit-180 to 180
[0]Reverse- Checked
- [Unchecked]
Specify whether to allow the reverse of light and dark for the model.- Checked
- [Unchecked]
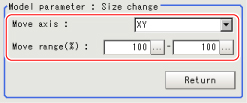
This is set when the size of measurement objects changes. When checked, tap [Detail setting] and specify a value for each item. - When the "Size change" option is checked, tap [Detail setting].The "Model parameter: Size change" area is displayed.

- Tap [Return].The "Model parameter" area is displayed.
Important
- Set the region such that the number of pixels in the model region is 995328 pixels or less.
- Sometimes detection exceeds the set angle range.
- When the angle range is set and the image registered as a model is measured, some error occurs in the rotation angle.