Screen Adjustment Settings (Camera Image Input)
Set the lighting and lens conditions for each camera.
Lighting Control
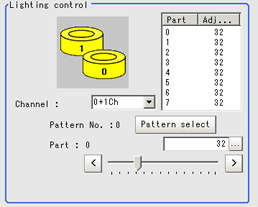
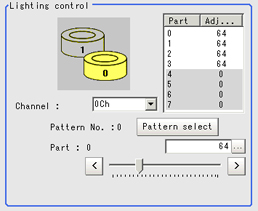
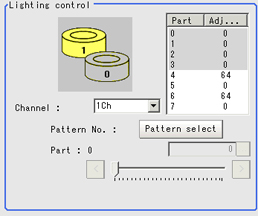
When a camera with a lighting function is connected, the light volume of the lighting can be adjusted from the controller. Brightness can be adjusted automatically or one of the preset patterns can be selected.
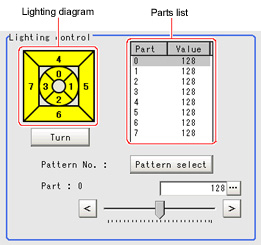
A lighting lamp image is displayed as a guide illustration.
 Reference
- When one scene contains 2 or more camera image input units, lighting control can be performed only for the first camera image input unit.
- In the item tab area, tap [Screen adjust].
- In the "Lighting control" area, specify the brightness.
The image display contents depend on the connected camera.
When an intelligent camera is connected
Important
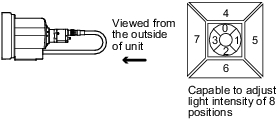
- When model FZ-SLC15 is connected, only parts 0 to 3 are active. Changing parts 4 to 7 will not affect the light volume of lighting.
| | |
|---|
| | Can be selected from a preset lighting pattern. |
| | After the camera is installed, if the orientation of the camera does not match the orientation of the lighting parts, tap [Turn] under the lighting diagram. The lighting diagram rotates 90 degrees clockwise each time you tap [Turn]. |
| | The light volume at each part can be adjusted to one of 256 levels. 0 indicates the lighting is OFF. The larger the number, the higher the brightness. |
MG-WAVE or electronic flash controller (FZ-LTA100) is connected:
Electronic flash controller FZ-LTA200 is connected:
CH0 to CH7 are used: | CH0 to CH3 are used: | CH4 to CH7 are used: |
| | |
| | |
|---|
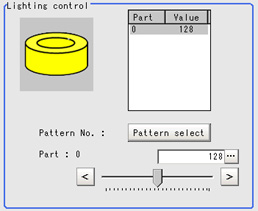
| | Can be selected from a preset lighting pattern. |
| | The light volume can be adjusted to one of 256 levels. 0 indicates the lighting is OFF. The larger the number, the higher the brightness. |
The light volume cannot be adjusted.
Line Bright
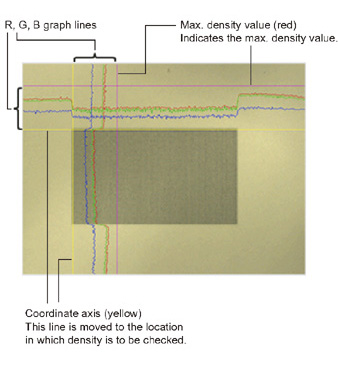
The graph showing the gray distribution for 1 line in the image is called the "Line bright". You can display the line brights for R, G and B for any horizontal or vertical line.
- In the item tab area, tap [Screen adjust].
- Place a check at "Display line bright".
- Move the line to the position whose density distribution you want to see.
Lens Adjustment Setting
This function is only displayed when an intelligent camera or an auto-focus camera is connected.
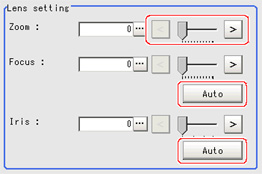
Make lens adjustments such as the focus and zoom. The optimum value can be set automatically for the focus and iris.
- In the item tab area, tap [Screen adjust].
- Specify the "Zoom" size while checking the image.
- Tap [Auto] at "Focus" and "Iris".
The focus and iris optimized for the zoomed image are set automatically.
| Setting value [Factory default] | |
|---|
| | Displays the image zoomed in and out. Depending on the focus setting value, it may not be possible to set a large zoom value. |
| | Adjust the focus. When [Auto] is clicked, the optimum focus for the current image is set automatically. |
| | Adjust the light volume that passes through the lens. When [Auto] is clicked, the optimum iris for the current image is set automatically. |
Important
- Auto focus and auto iris can only be used when setting with this screen open. They cannot be used during running.
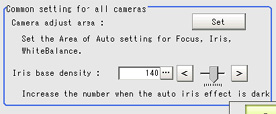
Common Setting for All Cameras
This function is only displayed when an intelligent camera or an auto-focus camera is connected. This sets the conditions for automatically setting the focus, iris, and white balance.
- In the item tab area, tap [Screen adjust].
- In the "Common setting for all cameras" area, set up "Camera adjust area" and "Iris base density".
| |
|---|
| This sets the region for judging whether or not the state is appropriate when automatically setting the focus, iris, and white balance. |
| Increase the number when the auto iris effect is dark. |


