[Measurement (Defect)]
Specify the range to be judged as OK.
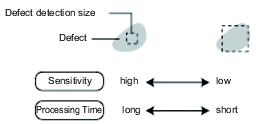
After drawing an measurement region, a rectangle is automatically formed in this region (the defect detection region). Move the defect detection region, calculate separately the mean concentration, and obtain the detection difference with surrounding defects (referred to as defect level). Then, calculate defect level with all defect detection regions. If the maximum value exceeds the criteria value, there are defects in the measurement region.
Increasing "Defect size" allows to shorten processing time, but will reduce measurement accuracy.
If conditions are changed, please verify with actual measurement.
- In the "Item tab" area, tap [Measurement].
- Set the value of each item in the "Defect size" area.
Table:
Measurement (Defect)
|
Set Value [Factory defaults]
|
|
|
|
|
Specify the upper and lower limit of defect size based on the size of stain to be detected.
The larger the difference between upper and lower limits, the easier it is possible to detect the defects of various sizes.
The larger the defect size, the more weaker the measurement sensitivity of upper and lower limits and the shorter the processing time.
|
|
|
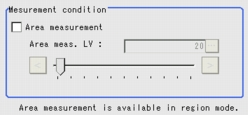
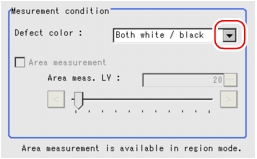
- If necessary, set the value of each item in the "Measurement condition" area.
The "Area meas. LV" can be set also by dragging the slider or by tapping the buttons at the ends of the slider.
Table:
Measurement (Defect)
|
Set Value [Factory default]
|
|
Detect Color (for monochrome cameras only)
|
|
Select this value when defects look darker than the background.
|
|
Select this value when defects look brighter than the background.
|
|
Select this value when the brightness of defects cannot be decided.
|
|
|
This item divides the high defect value regions into groups, and outputs the gravity center coordinates of the group with the largest area. This setting is only available in region mode.
|
|
|
Specify the defect value that is included in the defect area at the Area measurement.
|
- When the setting has been changed, tap [Measure] in the "Detail" area to verify whether measurements can be made correctly.
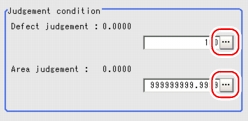
- In the "Judgement condition" area, tap [...] and input a value for each item.
Table:
Measurement - Judgement Condition (Defect)
|
Set Value [Factory defaults]
|
|
|
|
Specify the upper limit of Defect judgement (the Lower is fixed at 0).
When "30" is selected, the OK value should be within the range of 0 to 30.
|
|
|
Specify the maximum defect area.
|
 User's Manual, "Inputting a Value"The "Area meas. LV" can be set also by dragging the slider or by tapping the buttons at the ends of the slider.
 User's Manual, "Inputting a Value".
 Setting up [Defect].


