Model Registration (ECM Search)
Register the pattern characteristic of the measurement object as a model.In an ECM search, only the image profile information is registered.
Important
- For ECM search, 6 pixels at each end of an image cannot be registered as a part of the model.
- Upon re-registering a model, error models are deleted.Register error models when re-registering a model.
- In the "Item tab" area, tap [Model].
When setting a new model, you do not have to tap [Model].
- Use the drawing tools to specify the model registration range.
- In the figure setting area, tap [OK].
- Tap [Edge extraction], then confirm the edge extraction image.
- If there is unnecessary profile information in the model, tap [Mask] to set the mask.
- To check the model display, tap [Display model].
The registered model image is displayed in the "Image display" area.
 Note
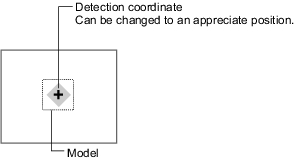
Note- When a model is registered, the center of the model is registered as the detection point.A detection point is a point output as a measurement value.
Changing Model Parameters
Model parameter values can be changed as needed to address unstable measurement results or to increase the processing speed.Normally, the factory default value will be used.
After changing a setting, check whether measurement can be done properly by performing an actual measurement.
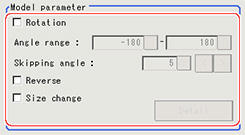
- In the "Model parameter" area, specify a value for each item.
| Set value [factory default] | |
|---|
| | When the measurement object is rotating, place a check at "With rotation" and specify how many degrees the model created rotates each time and through what range of angles.A smaller skipping angle increases stability, but slows down the processing.The normal direction is clockwise. |
| | | |
| |
| | Specify how many degrees the model created rotates each time.A smaller angle increases stability, but slows down the processing. |
| | Specify whether to allow the reverse of light and dark for the model. |
| | Specify whether to allow size change for the model. When checked, tap [Detail] and specify a value for each item. |
- When the "Size change" option is checked, tap [Detail].
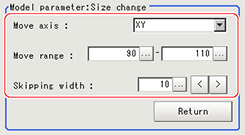
The "Model parameter: Size change" area is displayed.
| Set value [factory default] | |
|---|
| | Specify the model variable direction. |
| | Specify the range in which to change the model size. |
| | Specify the skipping percentage within the move range by which to change models being created.A smaller skipping width increases precision, but slows down the processing. |
- Tap [Return].
The "Model parameter" area is displayed.
Mask Any Unnecessary Items.
By registering a mask, the part you do not want included in the model is excluded.
- Tap [Mask].
- Draw the mask figure using the drawing tools.
- Tap [OR/NOT].
The mask figure is displayed in red.
- In the figure setting area, tap [OK].
Adjusting the Edge Level
In an ECM search, processing is executed on the edge extraction image.Change this item as necessary when the edge cannot be extracted or if noise is also being extracted.
Important
- In model registration, extract as much of the edge as possible, then delete noise etc. in the mask registration to register the entire edge of the model.On the other hand, when measuring, even if the edge has skips, an image with the noise suppressed makes it possible to search the model reliably. To set separate edge extraction conditions for model registration and for measuring, after registering the model, change the edge extraction conditions.
- In the "Item tab" area, tap [Edge extraction].
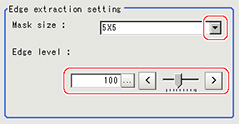
- Set the items in the "Edge extraction setting" area.
| Set value [factory default] | |
|---|
| | Select the range of pixels which are used to extract the edge.With a larger mask size, search is less affected by variation in pixels. |
| | Adjust the edge extraction level when the edge is hard to see due to low contrast with the background or when unnecessary background noise should be removed. |
 Adjusting the edge level


