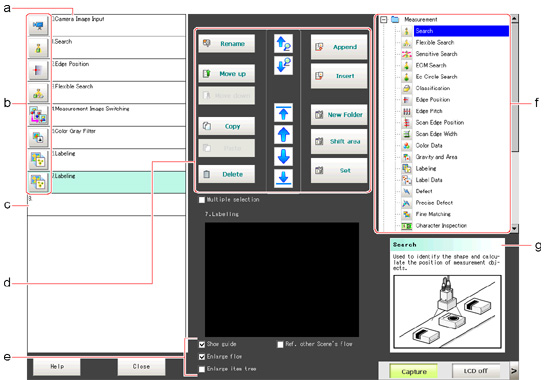
Layout of Edit Flow Window
This window is for compiling the measurement flow.Flow parts are displayed on the right side and the measurement flow is displayed on the left. If the measurement trigger is activated, processing is executed in sequence starting from the top of the flow.

- Unit list
Lists the processing units included in the flow.
You can create a flow for a scene by adding processing items to the unit list.
- Property setting buttons
Displays the property setting window where detailed settings can be performed.
- End marker
Indicates the end of the flow.
- Edit Flow buttons

 Search up/Search down
Searching can be performed to find out what position a processing item occupies in the unit list.
The icon for the processing item to be searched for is selected in the processing item tree and clicked.
This function is convenient when setting long flows.

 Select top/Select bottom
Selects the processing unit at the top or bottom of the flow.

 Select above/Select below
Selects the processing unit located one above or one below the currently selected processing unit.
- Rename
Displays a window for renaming the selected processing unit.
- Move up/Move down
Moves the selected processing unit upward or downward.
- Copy
Copies the selected processing unit.
- Paste
Pastes the copied processing unit immediately before the selected processing unit.Pasting cannot be performed if any operations other than paste are performed after copying.
- Delete
Deletes the selected processing unit.
- Append (Bottom)
Adds a processing unit to the bottom of the flow.
- Insert
Inserts a new processing unit immediately before the selected processing unit.
- New folder
Used when multiple processing units are managed as one group.
- Shift area
Changes related figure data in one batch.
- Multiple selection
Used when processing units are copied or deleted together.
- Set
Displays the processing item setting window for the selected processing unit.
- Display options
- Processing item tree
This area is for selecting processing items to add to the flow.Processing items are classified by type and displayed as a tree. Tapping the plus sign "+" of any item displays expanded contents below that item. Tapping the minus sign "-" of any item collapses the expanded contents.
- Guide
Shows an explanation for the processing item selected in the processing item tree.These are used as reference when selecting processing items. To display guides, check "Show guide" in "e Display options".

 Search up/Search down
 Select top/Select bottom
 Select above/Select below