Filter Setting (Halation Suppression+)
This item sets the filter.
- In the "Item tab" area, tap [Filter Setting].
- In the "Display" area, tap [Change display] to switch between camera image types.
 The displayed contents of the image display area will be switched.Setting itemSet value
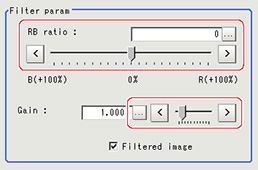
[Factory default]DescriptionONThroughThe latest image is always input from the camera and displayed.[Freeze]The image that was scanned in the immediately preceding measurement is displayed. - Set each item in the "Filter param" area.
 Setting itemSet value
[Factory default]DescriptionRGB ratio-100 to 100
[0]Adjust the balance of the red brightness and blue brightness for the shot image.
Specifying a larger value in the positive direction (R direction) makes the R component easier to suppress.
Specifying a larger value in the negative direction (B direction) makes the B component easier to suppress.Gain0.0001 to 9.9999
[1.0000]Adjust the gain for compensating the brightness of the output image. - As necessary, check the image after conversion.
 Setting itemSet value
[Factory default]DescriptionFiltered image- [Checked]
- Unchecked
To display the original image, uncheck here.