Filter Setting (Color Contrast Suppression)
This item sets the filter.
- In the "Item tab" area, tap [Filter Setting].
- In the "Display" area, tap [Change display] to switch between camera image types.
 The displayed contents of the image display area will be switched.Setting itemSet value
[Factory default]DescriptionONThroughThe latest image is always input from the camera and displayed.[Freeze]The image that was scanned in the immediately preceding measurement is displayed. - The section with color contrast on the image is enclosed.The image with the contrast suppressed is displayed.

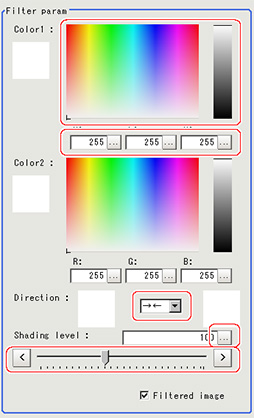
- Adjust the color, conversion direction, and color contrast suppression level as necessary.The picked up 2 colors are displayed at Color 1 and Color 2.
Fine adjustments can also be made to the R, G, and B values and on the color chart. Setting itemSet value
[Factory default]DescriptionColor 1- R
0 to [255] - G
0 to [255] - B
0 to [255]
The most separate two colors are picked up from the specified region.
The sections corresponding to these colors in the region are converted to the color midway between the two.Color 2- R
0 to [255] - G
0 to [255] - B
0 to [255]
Direction- [

 ]
] 

Select the conversion method for the set Color 1 and Color 2.
 :Color 1 and Color 2 are converted to the color midway between the two.
 :Color 1 is converted to Color 2.
 :Color 2 is converted to Color 1.Shading level0 to 255
[100]Set the level for suppressing color contrast.
The larger this value, the less the color contrast. - R
- As necessary, set the display image.
 Setting itemSet value
[Factory default]DescriptionFiltered image- [Checked]
- Unchecked
To display the original image, uncheck here.